Showing posts with label Minecraft. Show all posts

Wednesday, May 23, 2018

Minecraft Bedrock Edition Tutorials Custom Crafting Recipes!

In Minecraft pe have you ever wanted somthing that you can only get on creative, but you are on survival?  Well you can get those items by creating your own crafting recipes!

Warning: you will need command blocks for this.

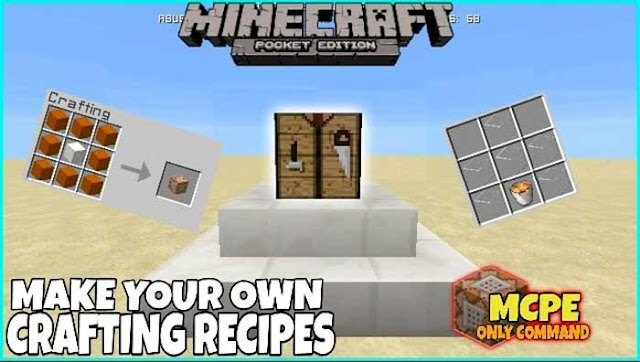
Here is a picture of one custom crafting recipe:


So first place four command blocks facing the right, then step back. Next place droppers facing up on top of the command block to the left, and the command block to the right. Then put the items that you want to craft with in the dropper to the left. Next type this in the command block to the left:

/testforblocks ~ ~1 ~ ~ ~1 ~ 100 64 255

The only thing you have to change is the "100 64 255" because you want the coordinates of where you will place the third dropper (AKA the crafting table). Then make the command block you just typed in a repeat, and always active command block. Next place the third dropper where you typed in the coordinates in the command block. Then put the thing (or things) you want to craft using the custom crafting recipe in the dropper on top of the command block to the right.  Next type this in the second command block from left to right:

/setblock 100 64 255 air

I used the "100 64 255" again because it has to be in the same coordinates of the third dropper. Then make that command block that you just typed in a chain, conditional, and always active command block. Next make the third command block from left to right a chain, conditional, and always active command block. Then type this in the command block that you just changed its modes (the newest chain, conditional, and always active command block):

/kill @e[type=item]

Next make the command block to the very right a chain, conditional, and always active command block, then type this in it:

clone ~ ~1 ~ ~ ~1 ~ 100 64 255

Just remember, instead of "100 64 255" use the coordinates of where you placed the third dropper
or else this will not work! You can do as many custom crafting recipes as you want!

Anyway I think that is really cool, but that's it for today!  Goodbye!

Friday, May 18, 2018

Minecraft Pe 1.4 Update

If you play Minecraft just in case you didn't know... it's finally here!  The 1.4 Minecraft Bedrock Edition Update is finally here!  It has added a lot of cool new stuff, and fixed a lot of stuff! It adds a new animation for the riptide Trident enchantment, and coral, and dolphins, and fish, and more!  The dolphins can chase swim with people inside boats, and phantoms swoop down at you or up at you, but they only come when it is night time, and you haven,t slept in five Minecraft days (or you can say an hour)!


  This new update has also added fish mobs (entities), which is actually really cool!


I think this new update is going to be awesome!  Anyway that's it for today!  Goodbye!

Wednesday, May 16, 2018

Minecraft The Orespawn Mod

Have you ever heard of the Orespawn Mod for Minecraft Java Edition? If you haven't heard of it, it is a mod that adds tons (maybe most) of the stuff from the Crazy Craft Minecraft Mod Pack! It is like the best mod like in the history of mods that are not mod packs! There is so much new stuff! Like (probably) Hundreds of new bosses, and also hundreds of new ores! (probably)  Also There is over 100 new mobs, and at least 90 new weapons! In the ore spawn mod the strongest sword is the "Royal Guardian Sword", and the strongest armor is the "Royal Guardian Armor" set! The strongest mob/boss is the "King" which is a BIG three headed white dragon, which can be found and summoned in the "Utopia Dimension". The King has over one thousand health because the strongest sword does 750 damage, and you have to hit the king at least twenty times!


The second strongest boss is the queen which is pretty peaceful at first spreading butterflies around, and spreading flowers!


 I think you have to get seen or attack her in order to start the big fight! This is what she looks like during the attack!


You might think this is the most peaceful mob/boss in the game but then it's definitely NOT!  The third strongest boss is MOBZILLA!  This is the most annoying boss in my opinion because I had beaten the king and queen multiple times, and gotten the prince and princess multiple times (which are pets that fight for you). Next I made the princes grow up into young adult princes! Then I accidentally summoned mobzilla for the second time, and then sadly my princes, and princesses all died!😭😭😭😭😭😭    Even more sadly after that my older brother deleted all of it!  NOOOOOOOOOOOOOOO! 


Sorry about all of the drama. Anyway that's it for today! Goodbye!


Minecraft pe mcpedl mods

In Minecraft Pe and JvE (Java Edition) there are quite a bit of cool stuff, but you can make it cooler by going to the website mcpedl.com, and installing some mods/add-ons! There are so much mods/add-ons, and texture packs/resource packs, it's crazy! Most of them are really cool, and fun! For an example the "Baby Player Add-on", is really cool because you are small and there are so many possibilities when you are smaller! But the view is still the same, but you know you still look awesome! If you are on the Fire OS then some of the add-ons you install, you won't have to get something like Es file explorer, or Astro file explorer. But some you will have to get one of the file explorers. Also there is a way to create your own add-ons! You can do this by going to any file explorer and downloading pictures from google or something. Then go into the file explorer and go to downloads, and copy the picture, and then go to either vanilla resource packs or to a resource pack you just downloaded. Then put the copied picture in whatever you want to replace it with! But you cannot put a human or zombie skin on something like an enderman, unless you create a behavior pack that changes the model of the enderman. I think that these add-ons/mods are really cool!


Anyway that's it for today I'll talk to you next time on the next blog! Goodbye

Monday, May 14, 2018

If you were to change anything about Minecraft what would it be?

In Minecraft have you ever gotten tired of just playing it normally?  Well there are ways to change the game up quite a bit! For an example, texture packs/resource packs, and mods/add-ons. Those can change Minecraft around quite a bit! Like making the endermen look like, and act like slendermen, and much, much more!

 The possibilities are endless!

I think that changing Minecraft around is awesome! I mean seriously! I mean who doesn't want Minecraft to be at least a tiny bit different? Minecraft is fun and all, but sometimes it can just become boring. So I just like to change it up a bit, right?!


Come on guys!


Anyway that's it for today! Goodbye!

Monday, April 30, 2018

Minecraft Pe Nova Skin Skin Finder


In Minecraft pe have you ever gotten tired of just having normal skins? Well I know how to get more with the website minecraft.novaskin. So just go to google or safari, and type this in minecraft.novaskin, then either go to gallery (where you can search skins), or go to Nova Skin - Minecraft Skin Editor (which is of course a skin editor). I have just recently made my own skin, and published it. It is called "my scuba steve" as you can see on the picture. Inside the skin editor you can search skins to edit, you can take colors from the skin you are editing, and the possibilities are endless with skins!


 I would highly recommend this website for skins!

Anyway I am so, so sorry about how short it was today, but that's it for today! Goodbye!

Friday, April 27, 2018

Tynker Minecraft Pe Add-on Creator

In Minecraft pe I have made so much add-ons for it, that I don't even know how much I have! I use this website (it could also be an app) called Tynker, and it's pronounced T-e-e-n-k-e-r, and NOT T-y-n-k-e-r (it is not supposed to sound like an "I"). Tynker is a website where you can make Minecraft mods for Java edition, and Bedrock edition.  You can also make mobs skins, items, textures, and player skins.  It's so cool!

The first one that I made up is called "wow"! Or you can call it the "Wow Cow", because it is a killer cow if you name it "Johnny" with a capital "J", and with a name tag of course! The "Wow Cow" was the second behavior pack that I made! The "Wow Cow" is a cow that starts out like a giant cow then shrinks to its's normal size when it gets attacked, then it grows a tiny bit more after five seconds! The "Wow Cow" also is a bad cow and is basically a boss, because it has one hundred health, and shoots blaze fireballs super fast, and it will usually hit you because you are two blocks tall...so yeah. I tried with a diamond sword, and it killed me before I could even hit it! I would recommend turning off mob spawning, and make mob spawners to make mobs, and make the "Wow Cow" a boss! Then I would turn that world into a cool map!

Here are some more mobs I made: "The Twins" (they are creepers), "Ahh!" ( it's a two headed iron golem), "Your worst nightmare" (it's a pig for java only), "The flaming sword" (it's a diamond sword with a different texture), "Sword Painting" (it's the texture of the outside not the painting itself), "Elytra Colored" (not when you are wearing it ☹️  ), "Guardian Sword!", "Flaming arrow"(sorry about the texture I kind of messed up), "Megalodon" (it's a big shark!), "Dumb so called agent!" (dumb looking agent which agents look like iron golems), "Mutant Ghast!", "More cows?(more evil cows), "cow werewolves" (cows turn into werewolves) and finally a skin that I kind of copied from one of my skins on Minecraft, "The neighbor" (from the game, Hello Neighbor).

These are all the add-ons, which are mods, textures, and skins, that I've made:


I have had so much fun with these mods they are super easy to make, they are fun, you create your own, and I have that much made up add-ons in just 3 or 4 days! Also it did not take me the whole day to make like two mods, it took me minutes to make two mods! I highly recommend it!

Anyway that's it for today! Goodbye!

Wednesday, April 18, 2018

Minecraft Pe, how to Make Secret Passage Walls


Hey guys what's up? My name is SmallSteveT!  Today is sadly going to be shorter, but is awesome!  Today I will be showing you how to make secret walls!  What do you need?  What do you need, well that's simple it's just one command block!  What can this be used for?  This can be used for making a secret passage to hide stuff from enemies or even friends!  What do you do with the command block?  Well everybody that knows about the command block should know that you just type in a command!  What command?  Well this is not long at all but here is the command:

/fill 100 64 102 100 65 102 stone_button 14

This should make a two-block tall, and one-block wide pillar of stone blocks, that you can walk through!  Just remember that you have to put the 14 in the command, and that you can break the block easily because it is two big stone buttons that you can walk through!  Pretty cool right?  I definitely think it is super cool!

I am sorry if you were disappointed about how short it was today. But that's it for today!  Goodbye!

Tuesday, April 17, 2018

Minecraft Pe how to Make a 3x3 Piston Door

Hey guys I have just recently changed my name from Ike06 to SmallSteveT, so if you sometime see me, then please leave that in the comments!  Anyway now I am going to tell you how to make a 3x3 piston door!  This contraption is useful because you can hide a secret base, if you hide the lever or button.  Very cool! First of all, you see those white blocks and stairs? In those spots you can put whatever you want there! Oh, and on top of that you can get any block or half block that you want, except for the Redstone mechanics! 

Here are the steps for making this bad boy! First make a way to power this big creation that you are about to make. Then place three blocks from right to left. Next place a Redstone Torch on the very right block that you've placed so far. Then, place Redstone Dust connecting to the torch, and of course make sure that the Redstone is going to the left. The next thing you will do is, place one block to the left of the Redstone Dust, except higher than it. Then place a Redstone Torch on top of that block that you just placed. Next place a sticky piston with a block on it to the right of the torch you placed, and then place a block of your choice to the left of the torch, (oh, and make sure it is facing the right). The next thing you will do is, place a Redstone Torch on the block to the left of the other torch. Then get a block with a Redstone Repeater with a four tick delay on top of it, and place it to the right of the torch you just placed on the last step. Next place an observer that is facing down with a Repeater that has a one tick delay on top of it, and place it to the right of the last block that had a Repeater on it. The next thing you will do is, place a sticky piston (that is facing the right) to the right of the Repeater with an observer below it, and then place a block on the sticky piston. Then place one block with Redstone Dust on top of it that is higher, and is to the left of the first Repeater. Next place a block right above the first Repeater that has Redstone dust on top of it as well. The next thing you will do is, place three sticky pistons (that are facing the right) on top of each other that each have a block connecting to the front of them (and make sure that the bottom sticky piston is to the right of the block with Redstone Dust on the last step). Then place two half blocks, and the first one is to the right of the block with Redstone Dust on it, except one block higher than the block with Redstone Dust on top of it (NOT the Redstone Dust itself). The half block is one block higher than the other half block, and is to the right of the other half block. Then place Redstone Dust on top of the first two half blocks, and then place two blocks one on top of the fourth sticky piston and one two the left of the block you just placed. Next place Redstone Dust on top of the first block on the step before this one ( in other words, the last step), and then place an observer on top of the second block on the last step. 

The next thing you will do is place two more half blocks, the first one is to the left of the block with Redstone Dust on the last step, and is one block higher than the block that I just mentioned. The second half block is to the right, and is one block higher than the other half block. Then place Redstone Dust on top of the two half blocks, and you can only do this if the half blocks are placed correctly. Then place two blocks with Repeaters on them. The first block with a Repeater is on top of the observer, and the Repeater has a four tick delay. The second block with a Repeater is to the side of the block with a Repeater that you just placed, and the repeater you will just leave alone (or you can say a one tick delay). Next place a block to the right of the second Repeater, and then place a Redstone Dust to the right of the second Repeater. The next thing you will do is, place two sticky pistons (both facing down), below the block connecting to the two second Repeaters, and one of the pistons you just placed is on top of the other. Then place one block on the bottom sticky piston from the last step, and then place a Repeater facing, and connecting, to the bottom sticky piston that I just mentioned. Next place Redstone Dust to the right of the second observer (this Redstone Dust will be facing the bottom sticky piston of the two sticky pistons facing down). The next thing you will do is, place a block with Redstone Dust on top of it to the right of the top sticky piston of the two sticky pistons facing down. Then place another block with Redstone Dust on top of it to the right of the last block with Redstone Dust on it, and below that block I just mentioned with Redstone Dust on it. Next place two blocks, one block is right below the block on the last step, and the other has Redstone Dust on it, and is to the right of the block you just placed. The next thing you will do is, place a sticky piston (that is facing down and has a block of Redstone on it) to the right and higher than the block with Redstone Dust that you just placed. Then place three sticky pistons (that are facing the left) below the block with Redstone Dust that was two steps ago, and make sure that they are on top and below each other. Next place four blocks, one has Redstone Dust on it, and you will place to the right of the bottom sticky pistons of the three sticky pistons (that are facing the right), and the other blocks you will place on the front (or you can say the face) of the three sticky pistons that I just mentioned. The next thing you will do is, place an observer (facing down) that is below the block connected to the bottom sticky piston (that is facing the right). Then place three blocks, one has Redstone dust on it and you place one block away from the third observer, and one of the other blocks is to the right of the block with Redstone Dust on it, and the last block is on top of the block to the right of the block with Redstone Dust on it that I just mentioned. Next place two sticky pistons (facing up), and the first sticky piston is to the right, and right above the first Redstone Torch in this creation, and the second sticky piston is right above the last one that you just placed. Now you should be done, but I would recommend filling all of the one-block wide, and one-block tall holes that you can fill just in case. 

Anyway, that's it for today! I'll tell you about something different on the next blog post! Goodbye!

Monday, April 16, 2018

Minecraft Pe how to Make a Better Secret Chest Using Commands and More


In Minecraft pe there are a few ways to make secret chests, but the best way is with commands!  Here are the steps for making a secret chest using commands: First get a command block and a lever, or button. Next place the command block above where the chest will be, and type this in it:

/summon chest_minecart ~ ~-1 ~0.5

the 0.5 will either be on the first "~" or the second one, but it can also be -0.5 on either of them depending on where you placed the command block. But depending on where the command block is, it could be 0.1 or 0.2 or possibly 0.3, or negative values for any of those numbers. If you do this correctly you should be able to access it and not be able to see it. But you have to have a block (any block) above the secret chest, or else you will be able to see the top of it!  Now I shall tell you how to make a locked chest with a sword lock pick!


Here are the directions for making the locked chest with a lock pick: First get these items: four command blocks, one iron sword, one chest, one shulker spawn egg, Redstone Comparator, one Redtone torch, a 6x2x3 hole in the ground, and how ever much you want of the block of your choice. The next thing you will do is place two command blocks at the thin back part of the hole, and make sure the arrows are both facing the right. Then make the command block on the left repeat, and always active. Then type this in the always active command block:

/enchant SmallSteveT looting 1

Then place the comparator so that the two red parts that are closer to each other are facing the always active command block. Then get out a iron sword, and place it in your hand. This will enchant your sword, and when it does it will power up the comparator!  The next thing you will do is place a block right in front of the comparator, then place a Redstone torch on that block. Next make the command block to the right of the always active command block a chain, conditional, and always active command block. Then type this in the chain command block:

/tp @e[type=shulker] 357 55 22

But type in the coordinates of the location right in front of the first chain command block, instead of the 357 55 22. Then place a command block to the right of the Redstone torch, and the arrow must face forward from where you were standing. Next make that command block a second repeating command block and do NOT make it always active. Then type this in the second repeating command block:

/tp @e[type=shulker] 357 58 22

The coordinates will be the same as the first, but the number in the middle (highlighted above) will be 3 above the other coordinates in the other command block. Then place another chain, conditional, and always active command block, then type this in that command block:

/effect @e[type=shulker] invisibility 99999 250 true

All of this will teleport the shulker in the spot of where you have to place the chest, and the shulker will be invisible so when you hold the lock pick it will teleport the shulker back to the original location. So now you have a locked chest and lock pick!  That is so cool, right?!

Anyway that's it for today!  Goodbye!

Thursday, April 12, 2018

Minecraft Pe how to Make a Secret Chest


In Minecraft have you ever wanted to make a secret chest? Well you can, and you could have for awhile! Here are the steps for making a secret chest: First make a 3 block high, and 5 block long wall out of the block of your choice. Then break the center block, and replace it with a chest. Next break the top middle block, and replace it with a stair block upside down, facing the other side of the wall. Then on the other side of the wall break one block on the ground, where the middle blocks are. 


Then break the block in the middle blocks under the wall -- two blocks directly beneath the chest (it's in the ground). The next thing you do is place two Redstone Dust under the wall, and in the hole in the ground. 


Next place a Redstone Torch on top of the block that is right before the Redstone Dust. Then place two blocks one block away from the torch on both sides facing the wall. 


Next place Redstone Dust on top of the blocks with the Redstone Torches on them. Then place Redstone Repeaters on the blocks right next to the one Redstone Torch on both sides. Next place a Sticky Piston on top of that one middle Redstone Torch.  The next thing you do is place two normal Pistons on top of the two Redstone Torches facing the wall. 


Next you will destroy one of the Redstone Dust on one of the blocks with the Redstone Torches on them, 


and place the block of your choice on the normal piston next to the Redstone you just broke. Then place the Redstone back where it was. 


The next thing you do is, place a button right below the chest. 


Then your creation should be ready for trying it out! When you press the button, the chest goes back, and the block of your choice pushes the chest out of the way, and the sticky piston pushes your block of choice out to the front. This makes it so your chest is secret!


I think that's pretty cool, right?

 Anyway that's it for today! Goodbye!

Monday, April 9, 2018

Minecraft Pe How to Make Magnetic Arrows and More!

In Minecraft, have you ever wanted to keep mobs in one place for just a few minutes?  Well, now you can with the Magnetic Arrows Cheat!


  All you need is just a command block, and that's it.  First type this in the chat:

/tickingarea add ~-2 ~-2 ~-2 ~2 ~2 ~2 CMD

Then get a command block and make it always active and repeat.  Next, type this in the command block:

/execute @e[type=arrow] ~ ~ ~ tp @e[r=5,type=!player,type=!arrow] ~ ~1 ~

This will make it so everything except for other arrows and players, within a radius of 5 blocks, will teleport to the arrow you just shot!  This is helpful because on survival, enemies will chase you, and you can just keep them in one place and build a fence around them. 

Now for another command.  The Super Arrows Cheat!


  First get a command block, and change it to repeat and always active.  Then, type this in the command block:

/execute @e[type=arrow] ~ ~ ~ kill @e[type=!player,r=5]

This will kill everything except for players within a radius of 5 blocks of the arrow.  This is helpful for getting mobs out of the way, and getting tons of items that the mobs drop (commonly called "drops").  That's pretty cool, huh?!

Anyway, that's it for today!  Goodbye!

Friday, April 6, 2018

Minecraft Pe /give Command Components and More

In Minecraft Pe the "/give" command has only two components =( . Those components are called "can_place_on" , and "can_destroy".


 But this will make the command more longer. Also these parts of a command they are used for adventure mode only, they don't do any thing on survival or creative. Here is a example of the "can_destroy" part of the command:  you are on adventure mode because your friend wanted to be kind of mean and wanted to test you.


 So you type in this:

/give @s diamond_pickaxe 1 0 {"can_destroy":{"blocks":["stone","cobblestone","iron_ore","diamond_ore"]}}

This will give you, well, a diamond pickax (in minecraft a pickax is called a pickaxe) that can destroy stone, cobblestone, iron ore, and diamond ore. Also you will probably want to type this in if you can't find a cave:

/give @s diamond_shovel 1 0 {"can_destroy":{"blocks":["grass","dirt"]}}

This will make it so you can dig through the grass, and dirt in order to get to stone if you can't find a cave nearby.  Here is a example of the "can_place_on"(which is the other component of the command) part of the command:  you are still on adventure mode because of your friend, and you need shelter for the night. So you type this in:

/give @s planks 64 0 {"can_place_on":{"blocks":["grass","planks"]}}

This will make it so you get oak planks that you can place on grass, and oak planks so now you can get shelter. Then your friend takes you off of adventure mode and on to creative mode again, and you have finished your test.

Now I will tell you how to make a good doorbell with commands.


First make your house, then break two blocks up so a player could fit in that space. Next place a command block on the bottom block, and type this in:

/playsound random.levelup @a ~2 ~ ~ 1 0.5

Then place a block above the command block and place a button on that block you just placed.
This will play a sound of a player leveling up their experience point bar, but more slower than normal. The "1" in the command means how loud the sound is, and you can make this as loud as you want! The "0.5" in the command means how slow or fast it is. The normal setting for this is 1. This command will sound extremely like a doorbell or maybe wind chimes.

Anyway that's it for today! Goodbye!

Tuesday, April 3, 2018

Minecraft Pe Title Command and More


In Minecraft there is a title command.  If you have noticed it and have never used it, don't you wonder what it does?!  Well, I am now going to tell you!  Here are some examples:

/title @a clear

This command will clear any titles on the screen for everybody.

/title @a reset

This will put the title command to default settings, if you've changed the settings.

You can also make a title and a subtitle.  The title is in large words in the middle of the screen, and the subtitle is in smaller words beneath it.  You have to have a title in order to have a subtitle.


So if you wanted to make a title and subtitle that says, "GOODBYE my friends", first type in the title like this:

/title @a title Goodbye

This will display the message "Goodye" in the middle of the screen as a title.  Then write in your subtitle like this:

/title @a subtitle my friends

These two commands combined would look something like this (with a different font, of course):


You don't have to use "Goodbye my friends" as the message.  You can put anything you want!

/title @a times 60 140 80

This will change the settings of the titles that you use next.  It will make the title fade in, and then stay, and then fade out.  The numbers are ticks.  There are 20 ticks in a second.  So the command above makes it fade in for 3 seconds, it stays for 7 seconds, and then fades out for 4 seconds.

If you want to prank your friends, here are the steps:

First, get two command blocks and place them so the arrows on them are facing right from where you are going to be standing.  Place a button on the command block to the left, and type this in the command block that you just placed the button on:

/title @a title §4run!

This will get rid of the §4 and say "run!" in red letters.  The numbers determine what color the letters are.  If it's a different number like 3, it will be cyan. In order to make the § sign on the computer, press "alt 0167".  In order to do it on the Kindle Fire, hold the copyright sign down, and put your finger all the way to the left once the other options appear.

Then, make the command block to the right a chain command block.  Then type this in that chain command block:

/title @a subtitle §4it's herobrine

This will make a smaller title in red, below the red title saying "run!".  So now it will say "run! it's herobrine", and it will look something like this:

run

it's herobrine


Here is another way to prank your friends!  First, get a command block, and type this in the hover note in the command block:

Herobrine

Then, type this in the command block:

/say I bet you've heard of me for I am Herobrine and you shall all perish very very soon

This will look like it's Herobrine saying to you that you'll die very soon, which is a great way to prank your friends!

Anyway, that's it for today!  Goodbye!

Wednesday, March 14, 2018

Minecraft PE Throwing Fireballs with Commands

In Minecraft PE, sometimes I get so tired of Ghasts shooting fireballs at me, so I made the Throwable Fireball Machine! 

To do this, first get one to three command blocks (check out one of my earlier posts on command blocks if you don't know how to do this), then place them.  Make one of them always active. Then type this in to the command block that is always active:

/tp @e[type=fireball] @e[type=snowball]

This will make it so when you throw a snowball, a Ghast fireball will teleport to the same spot as the snowball, and it will be thrown in the same direction, and it doesn't fall down like a snowball does. 

The next command block in the machine is optional. Make one of the command blocks that you placed repeat and always active.  Then, type this in the new command block:

/tp @e[type=fireball] ~ ~2 ~

This command will teleport the fireball to right above the command block, until you throw it.  This is helpful so when the Ghast shoots the fireball, you will not accidentally get attacked.  Remember, you don't have to do this one.

The next command block in the machine is also optional.  First, make a command block repeat and always active, just like before, then type this in the command block:

/tp @e[type=ghast] ~ ~1 ~

This will teleport the Ghast in one spot, so that way it won't be far away from you, which would make it harder.  Just remember, you don't have to do the last two command blocks if you don't want to.  It just sometimes makes it easier.

Anyways, that's it for today!  Goodbye! =(


Tuesday, March 13, 2018

Minecraft PE Invincibility Machine Cheat and More

In Minecraft there are tons of cheats, or some people call them "hacks" or "hax."  One is the infinite diamonds/iron/emeralds/coal/Lapis Lizuli (which I will explain later in this post).

Now let's talk about the "replaceitem" invincibility machine.  This cheat makes it so when you die, you will always respawn in the same spot where you died, and have all of your stuff!


 First make a command block redstone block clock which looks like this:


In order to make the clock you get a command block (I've told you how to do this in some of my other posts), then place it. Then change it to a repeat command block.  Then, set up another command block with one block in-between them, and place the command block North of the repeating command block.  Then type this in the new command block:

/setblock ~ ~ ~-1 redstone_block 0 destroy

Note: This -1 in the coordinates means that it is one block South of the new command block, so it is in-between the new command block and the repeating command block.  If you want to learn more about coordinates, check out my video that you can find in the label section under "coordinates."  

Then, activate the second command block by placing redstone dust next to it, and a redstone torch next to the dust.  This should activate it (warning: you must be close enough to the command block for it to work).  Then type this in the OLD command block:

/replaceitem entity ike06 slot.weapon.offhand 0 totem

Type this in, but use your name instead of mine, Ike06.  And there you go!  This cheat is very useful.

Now, here is a picture of the block dupe glitch that I will talk about next:


This hack duplicates any block.  It is the the infinite diamonds/iron/emeralds/coal/Lapis Lizuli that I talked about at first.

In order to do this hack, you need about 15 redstone dust, 3 repeaters (one which is set to three-ticks, which kind of isn't really in the picture), and 1 sticky piston to the right, and 1 piston to the left.  This will make it so one piston pushes and pulls back the block, and the other piston pushes that block off, and it duplicates the block.  It keeps on pushing and pulling and getting you more and more blocks.  This glitch is super useful!

Anyway, that's it for today!

Monday, March 12, 2018

Minecraft PE: How to Make Custom Mobs

In Minecraft PE you can create custom mobs.  You can replace or change what they're wearing, so that's what makes them custom.

This is a Husk with a pumpkin head:


These are zombies with orange wool heads:


You do this by using the "replaceitem" command.  Here's an example in a command block:

/replaceitem entity @e[type=skeleton] slot.armor.head 0 pumpkin

This command will put a pumpkin on a skeleton's head! It's so cool.


 I'd make the command block repeat and always active. But I would first type this in the chat so it will block the output dialogue, which gets annoying sometimes:

/gamerule commandblockoutput false

You can type the "replaceitem" command with any mob and any item (in certain cases).  You can make the mob use the item, or drop the item, depending on what mob it is.  Here are different slots, or difference places you can put stuff, for entities on the "replaceitem" command:

  • slot.armor.chest
  • slot.armor.legs
  • slot.armor.feet
  • slot.armor.head
  • slot.horse.armor
  • slot.horse.chest
  • slot.horse.saddle
  • slot.horse
  • slot.hotbar
  • slot.inventory
  • slot.villager
  • slot.weapon.mainhand
  • slot.weapon.offhand
There are more than 100,000 combinations for just weapons, like swords, and armor!  You can do the "slot.weapon.mainhand" with any item you want -- it will put any item you want in your main hand (right hand).  This is such a cool command!

I'm sorry if you wanted to know more, but that's it for today! :(  Goodbye! :(


Minecraft Bedrock Edition Tutorials Custom Crafting Recipes!

In Minecraft pe have you ever wanted somthing that you can only get on creative, but you are on survival?  Well you can get those items by c...